
 When I first visited this house 18 years ago, I remember saying to my real estate agent that “this thing has got to go”. I was referring to the ugly interior door that separated the entry hall from the rest of the house. And yet, it’s still here and referred to as the “Eyesore Door”.
The thing is that over the years, life got in the way. Between the time and energy required to build a career, to enjoy a social life, and to tend to other priorities like cooking, cleaning, laundry, running, writing this blog and raising a cat, the years escaped on me.
Plus, there was a priority list of other home renovations that needed to get done, because of fixtures running their course or other corners of the house that got on my nerves worse than the door.
Despite being a relentless eyesore, it faded from my radar. But this was the year to finally do something about it.
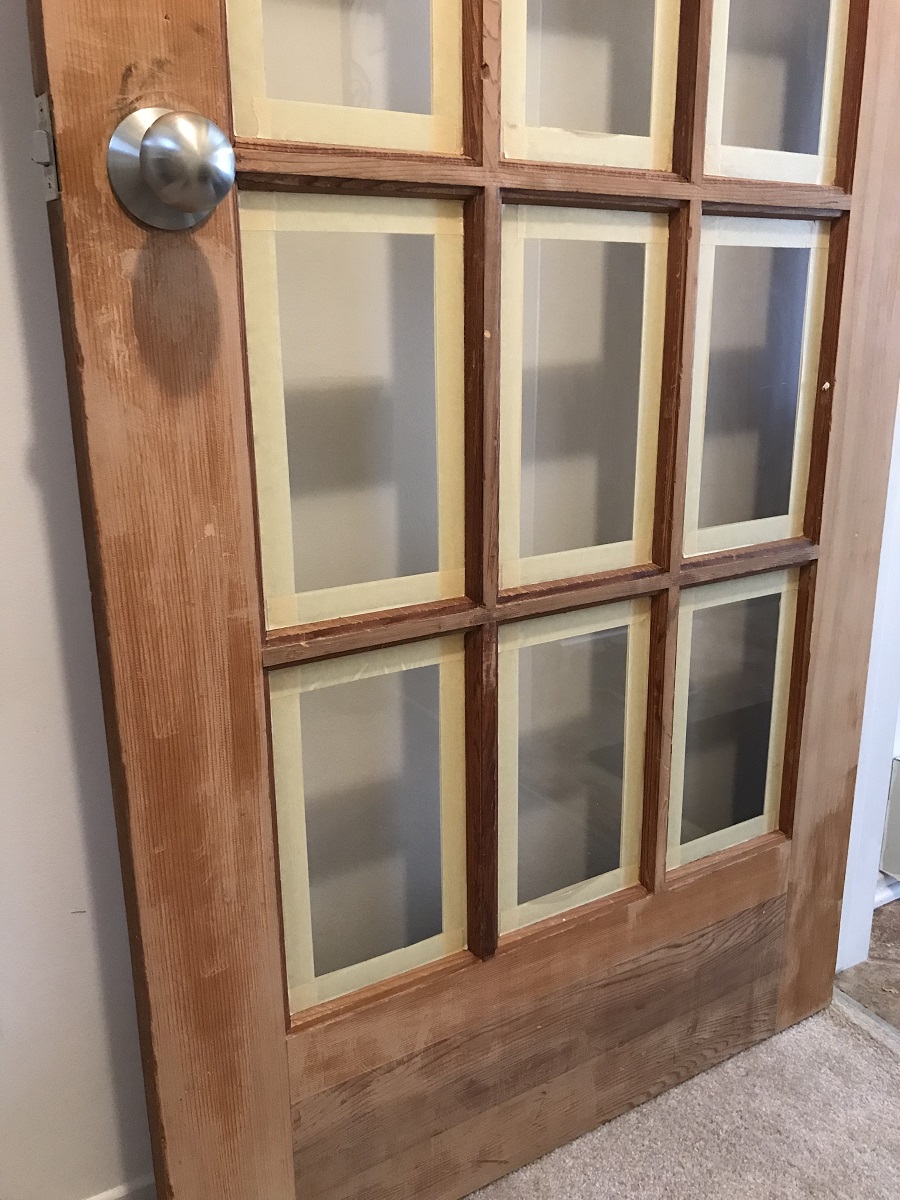
The door was probably cute when it made its first appearance. It was made of a soft, honey-coloured wood but it was prone to scuffs and scratches. Located in the most high traffic area of the house, it picked up scars from anything and everything that brushed by. The door was also my clear evidence that pets lived here before Ivy and I moved in.
What I couldn’t figure out was how and why this particular door was here, when it didn’t match any other fixture or finish in the house.
Either way, a light sanding would never have sufficed to correct the imperfections covering pretty much every square inch of its surface.
The bigger problem was the way it dragged along the carpeting. On humid days, you needed superhuman strength to open it, although it made for a great security system for my feline escape artist who has an attraction for bolting through open doors.
My partner recommended I get a hand plane to shave it down.
At the hardware store, after navigating each aisle like a Zamboni driver and still looking lost, a clerk found me, led me to the right section, and asked if I had used a plane before. I realized that my Grade 9 wood working class was 40 years ago, so I could not claim any recent experience.
He suggested instead a budget priced sander, some coarse sandpaper and to “just sand the bottom of the door to bring it down to size”. It sounded like a good idea.
On a sunny summer day, I secured Ivy the Wonder Cat in a bedroom with her litter box, some food, some water and her favourite toys. I then unhooked the eyesore door from its hinges and brought the door to the back deck.
In the sander’s user manual, the first instruction was to peel off the backing from the sandpaper to reveal the adhesive. I fiddled with the sheet of sandpaper for a good 10 minutes, trying to find the magic corner that would peel back. After three exasperated exhalations, I looked over at the package of sandpaper only to see “NON-ADHESIVE” in bold letters on the front.
Sandpaper 1, Observation skills 0!
I moved on to the next set of instructions that started with, “If your sandpaper does not have an adhesive backing”. After several minutes of playing sandpaper origami and still not securely clipping to the sander, I went into “MacGyver” mode and I developed my own method.
I don’t know who planned this house, but it seems that I have an excess of electrical outlets in rooms that don’t need them, and a shortage in rooms that do. To be able to use my sander on the back deck required a grounded extension cord running from the living room. And moments later, I realized I needed an extension to the extension cord as I still hadn’t reached the door.
Finally, I hit the on button! I was sanding! But Mother Nature’s incredible sense of humour kicked in, as did a westerly breeze that blew sawdust into every orifice above my neck.
Moments later, I emerged from the house looking like a bank robber with a dishtowel tied around my head because, for some reason, I could not find the little face masks I had purchased in anticipation of the sanding event.
I resumed my sanding and after half an hour, I decided to take the door in, to test it out and see how much longer I needed to go. As I was lugging the heavy door through the living room, something seemed off with the positioning of the doorknob and the hinges.
Oh oh!… I sanded the top of the door, not the bottom!
I turned around and lugged the heavy door back on the deck and sanded for another 20 minutes. When I affixed the door to the hinges, I noticed a significant improvement as it was swinging pretty freely… Maybe too freely.
That was when I noticed that the latch (that never really worked correctly) needed replacing since the door could open with the slightest nudge of a finger or potentially, a paw. That was my signal for a quick drive back to the hardware store to purchase some new hardware.
The installation of the new latch was pretty easy, especially since I had to do it twice when I realized I had installed it backward. It was in that process that I figured out that the original latch was simply missing two additional pilot holes to fit snugly within the door and to properly click shut.
I know home renos might not be for everyone, but properly fitting hardware was a mere TWO drilled holes away. TWO! I still shake my head in disbelief. But I didn’t regret the purchase of a shiny new latch and locking mechanism that already gave the door a huge facelift.
The next mission was patching and painting.
Since I was not blessed with the steady hand of a professional painter, masking tape has always been a necessity for me. But with the 15 windows on that door, it was a tedious project in itself to mark off each window, front and back, with my trusty tape.
Then it was another big project to fill as many cracks and scratches as I could with filler. I really don’t mind this part too much as it is an opportunity to channel some mild OCD tendencies to constructive use.
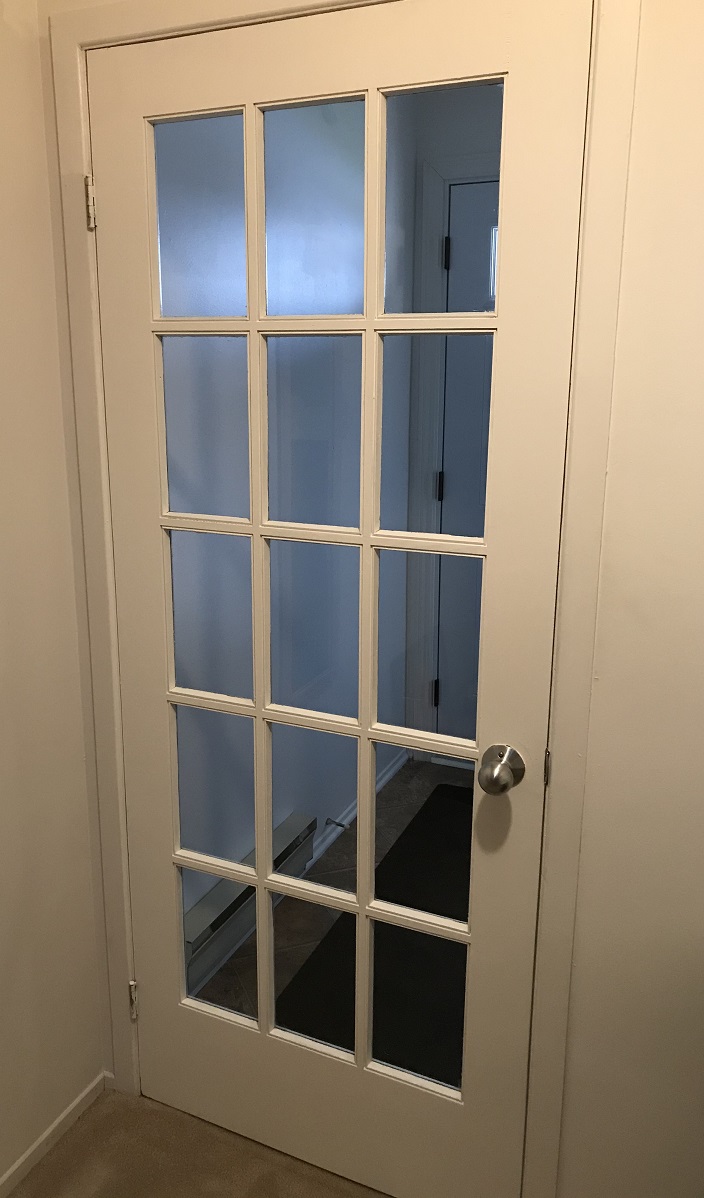 After all that prep work, the painting was pretty much the easiest part. Four coats of white paint later, with more crack filler along the way, I was ready to say “mission accomplished!”
It is unfortunate that it took 18 years to finally get the door done, but in retrospect I now see how much TLC it needed, which is probably why it landed on the bottom of the list.
For all of the different renovation skills I was able to put into practice, it was definitely a good learning experience that also offered many good belly laughs along the way.
But after all that work and the door is now looking (almost) as good as new, I am finally ready to retire its name, “The Eyesore Door”, as it isn’t anymore.
Did you enjoy this post? If you did, your likes and shares are most appreciated.
If you haven’t already, please check out the rest of my blog at andrebegin.blog. From there, you can click on the “Follow” button to receive future posts directly in your inbox.
Sincere thanks for reading!
Have a great day,
André


Leave a comment